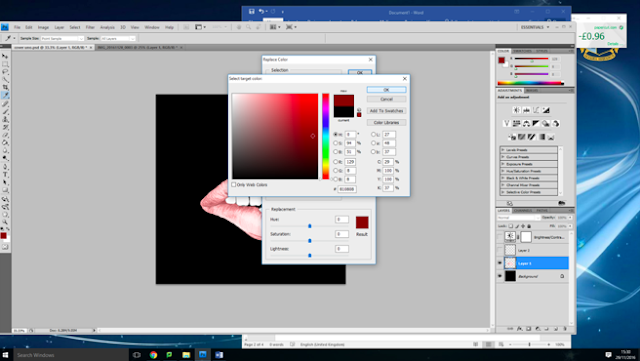
I first opened the scanned image onto photoshop, from which I decided to crop it down to a smaller scale so that it would be easier for me to remove the background.
After cropping the image, I used the magic wand tool to get rid of the white background surrounding the mouth. I struggled with getting this smooth because of the shape of the drawing; the edges weren't clearly defined which meant that it would keep trying to select the wrong parts to get rid of. However using the 'alt' key I was able to change the selection to make it more specific.
Once I had got rid of the white background completely I opened up a new tab. This was to allow me to create the background for my front cover. I used the dimensions 60cmX60cm in order to get the perfect square shape.
This then opened up a square document for me to work with. Because I wanted the background to be all black I used the pain bucket tool in order to completely change the colour. Once this was complete, I went back to the other tab with the drawing of the mouth and used the select tool to copy the image so that I could then paste it onto the black background. After this, I decided to change the colour of the lips. I went on image and then to adjustments. From here I went down to the 'colour replace' tool. This then opened up a new window, which allowed me to pick the colour that I wanted to use - I chose red. I applied this and then went to the paintbrush tool so that I could start to colour in the mouth. I zoomed in on it so that I could make sure I didn't miss any sections.
Once I was happy with the colour, I decided that I wanted to have the lips at a higher contrast in order to make them stand out further. Therefore I adjusted the contrast and brightness of the layer to make them appear more vivid. I was happy with the outcome of this as it made the colours in the image a lot bolder.
When looking at the image I was generally very happy with the outcome, however I felt like a few things needed adjusting. I decided to go over the teeth with white using the paintbrush, this was to make the more vibrant and less grey looking. I also used the rubber tool so that I could go around the edges of the lips and make the smoother.
Now that I have got the image on my digipak, I need to add the artist name to the cover also. I plan to use the same font for my artist name that was used in my music video in order to show consistency between the two products. I have decide not to include the album name on the front of my digipak. This show how I am going against the conventions. I have decided to do this because I want the over to follow a minimalistic style and not look crowded. Therefore I am going to include the album name of the spine and back of the digipak .


No comments:
Post a Comment